Ok, everyone is asking me how I made this cake, so I decided without further ado I would post the directions now. I actually have seen this cake on several other food blogs, and have been dying to make it since last year. Here is one of the sights
Here that I found! I tweaked mine a little by adding another red layer of cake to the bottom.
For my cake I made one white cake, a red velvet cake & a blue velvet cake and topped it off with cream cheese frosting. Needless to say I had a lot of leftover cake. To keep it simple here is what I would do next time. Mainly because if I make a red velvet cake, I have to use cream cheese frosting. Just my rules, and you don’t have to play by my rules. But red velvet cake and cream cheese are just meant to be together. Cream cheese frosting is much softer and harder for me to get smooth.
Okay…Ready…Set…Lets Go
Preheat oven to 350*
Grease and lightly flour 2- 8” cake pans
Ingredients:
2- boxes white cake mix & (the ingredients it calls for, on the box)
Americolor super red gel
Americolor royal blue gel
Buttercream frosting (recipe follows)
Prepare one box of white cake mix exactly according to directions on the box, but once it is mixed you will add in the super red gel, it takes quite a bit of the food coloring, so start with 1- teaspoon, mix and add until you reach the right color. Pour into prepared cake pans.
After cakes have been baked & removed from cake pans, let them cool completely.
Now wash, dry, grease and lightly flour your 2-8” pans again.
With second box of cake mix, you will mix exactly as the package recommends, but when cake is completely mixed then you will divide batter into two bowls.
In the first bowl you will leave the batter white.
In the 2nd bowl add the royal blue gel, it takes quite a bit of the food coloring, so start with a ½- teaspoon, mix and add until you reach the right color.
Pour your white batter into 1 of the 8” cake pans.
Pour the blue batter in your other 8” cake pan.
After cakes have been baked & removed from cake pans, let them cool completely.
Okay now cut both of your red cakes in half, so that you have 4 total
Now you are going to cut your white cake in half so you have 2 total.
* Leave the blue layer just the way it is (Do not cut in half)
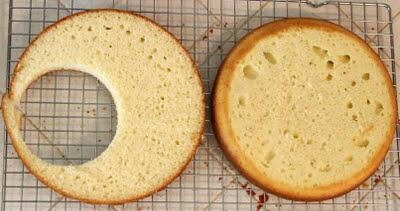
NOW, cut a 4” circle out of the middle of the blue cake layer (discard the 4” circle, or do what I do and eat it…)
NEXT, cut a 4” circle out of one of the layers of the white cake (this time it’s the 4” circle you keep, not the outer part.)
Last do the same to one of the red layers, keeping the 4” circle.
NOTE: I use the lid to a sour cream container for the template to cut my 4" circles.
You're ready to assemble your cake when you have...
1 thick layer of blue, with the center cut out
2- 8" layers of red
1- 4" layer of red
1- 8" layer of white
1- 4" layer of white
Assemble cake with a thin layer of frosting between each layer of cake, starting on the bottom with red cake, then white, then red, then blue. Add some frosting along the inside "ring" of the blue cake to hold in the next two layer which will fit inside the opening. Fill the hole in the blue cake with a 4" round layer of white cake, some frosting, and then the 4" round of red.
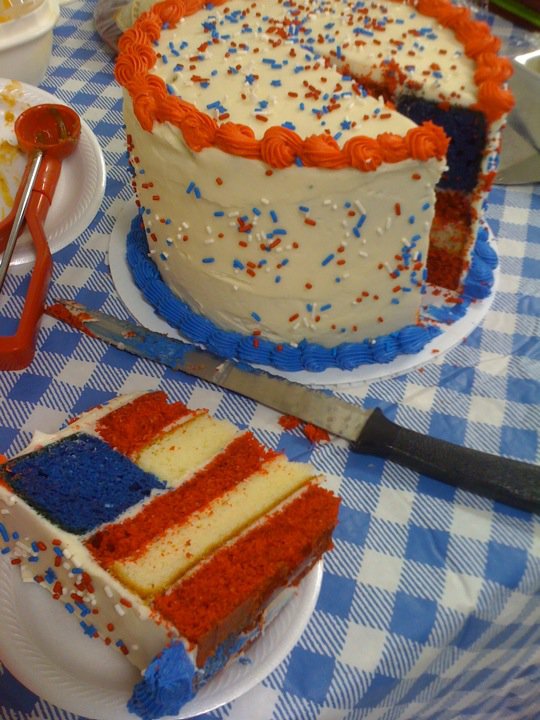
Once the cake is assembled, frost and decorate... Then when it comes time to cut just watch the expression on everyone's face.
My buttercream frosting recipe:
Ingredients:
1/2 cup solid vegetable shortening
1/2 cup (1 stick) butter or margarine softened
1 teaspoon clear vanilla extract
4 cups sifted confectioners' sugar (approximately 1 lb.)
2 tablespoons milk
Makes:
About 3 cups of icing.
Instructions:
Step 1
In large bowl, cream shortening and butter with electric mixer. Add vanilla. Gradually add sugar, one cup at a time, beating well on medium speed. Scrape sides and bottom of bowl often. When all sugar has been mixed in, icing will appear dry. Add milk and beat at medium speed until light and fluffy. Keep bowl covered with a damp cloth until ready to use.
Step 2
For best results, keep icing bowl in refrigerator when not in use. Refrigerated in an airtight container, this icing can be stored 2 weeks. Rewhip before using.
This is the end result... this cake is so beautiful! The fun part is don't let anyone know about the inside; let them be pleasantly surprised when the first cut is made. Seriously can't wait to get to make this again!
~ENJOY~